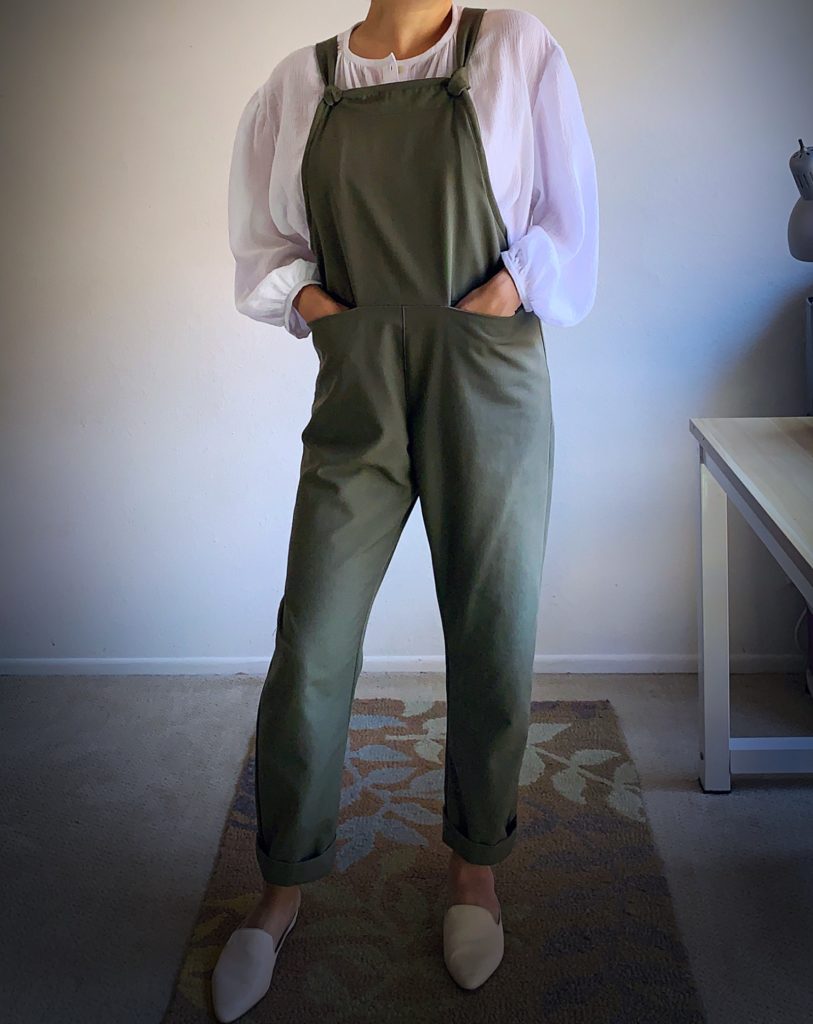
Made By Jack’s Mum Heyday Dungarees Hack
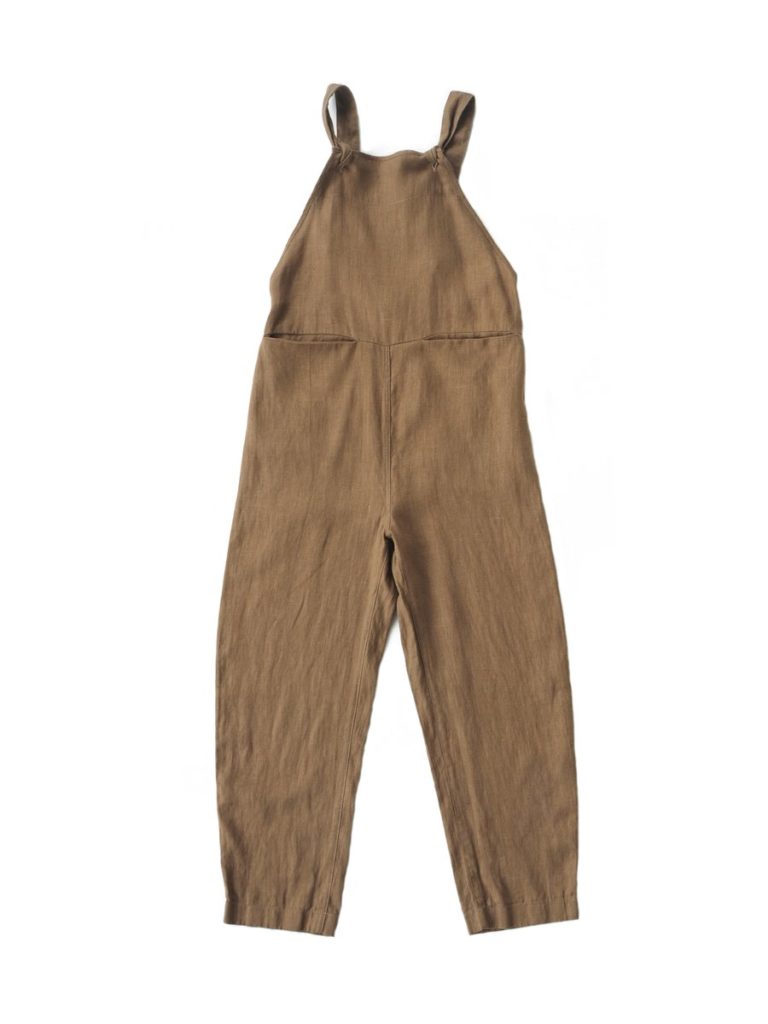
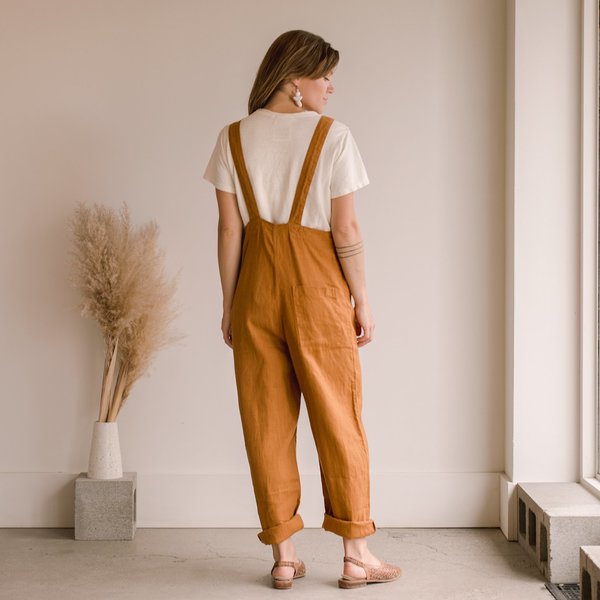
This Heyday Dungarees hack was inspired by the work of a small indie clothing designer named Katie Beaton of Beaton Linen. I love their minimalist aesthetic and focus on sustainability. If I could afford to support them I would, but that’s not an option for me so of course I did the next best thing. I made something that looks similar! It’s important to state here that I feel slightly guilty for sharing this hack. I don’t intend to deter anyone from purchasing clothing from this ethical business. Anyway, this is only my take and not a prefect replica.
On Instagram I came across a post by Meg from Cookin’ & Craftin’ sharing an Overalls Pattern Roundup for the Sew Bibs Instagram challenge (#sewbibs). The Beaton overalls had been on my mind for too long! When I saw the Heyday Dungarees pattern as an option, I knew it had the general shape I needed. It’s really cute as is, but I needed the special details of my inspiration, like inseam pockets and bindings.
A Wearable Muslin
Although I’d say I’m not big on making muslins like some other sewists out there, I did decide to do a wearable muslin for this hack. I found a poly rayon fabric at Joann that was on sale with only a couple yards left on the bolt and dived right in. On a side note, I partly have problems with muslining because I find it so wasteful. All of the wonderful benefits aside, I think I would much rather go for a wearable muslin and get some use out of that time spent. That’s just me.
This fabric is also pretty cool for dungarees. Ninety-five percent of the time I choose natural(ish) fibers but it’s nice to wear clothing that resists stains and wrinkles as well as this poly blend does. The first day I wore my new dungarees I found a food handprint left by one of the kids (like, why do I even try to wear clothing in this family) and it came out easily with a damp washcloth! Yay for me. Also note that, for me, this pattern hack did not require any additional fabric.
Hacking the Pattern
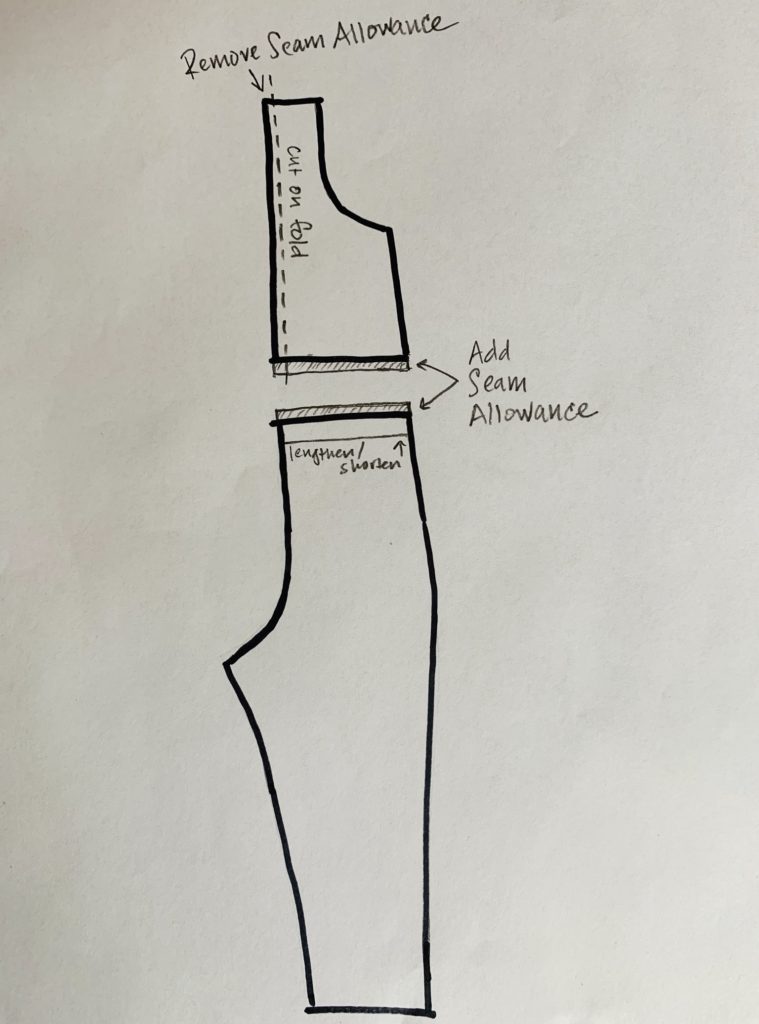
Preparing the Pattern Pieces
First things first. We’ve gotta alter the front piece to look like our inspo and to allow for those cool inseam pockets at the front waistline.
After cutting out the pattern piece in my size M, I cut straight into my pattern pieces to make my alterations. Do this at your own risk or opt for tracing like responsible sewists do.
This pattern includes a 3/8″ seam allowance. I’ll walk you through the changes I made.
- Measure 1″ above the lengthen/shorten line on the Front pattern piece and cut straight across. You now have a Top Front Piece and a Bottom Front Piece.
- Add 3/8″ seam allowances to the new pattern pieces where the pattern was cut. *see my trusty little hand sketch.
- Remove the seam allowance from the center front of Top Front Piece as this will be cut on the fold.
Cutting the Fabric
- Cut the new Top Front Piece on the fold.
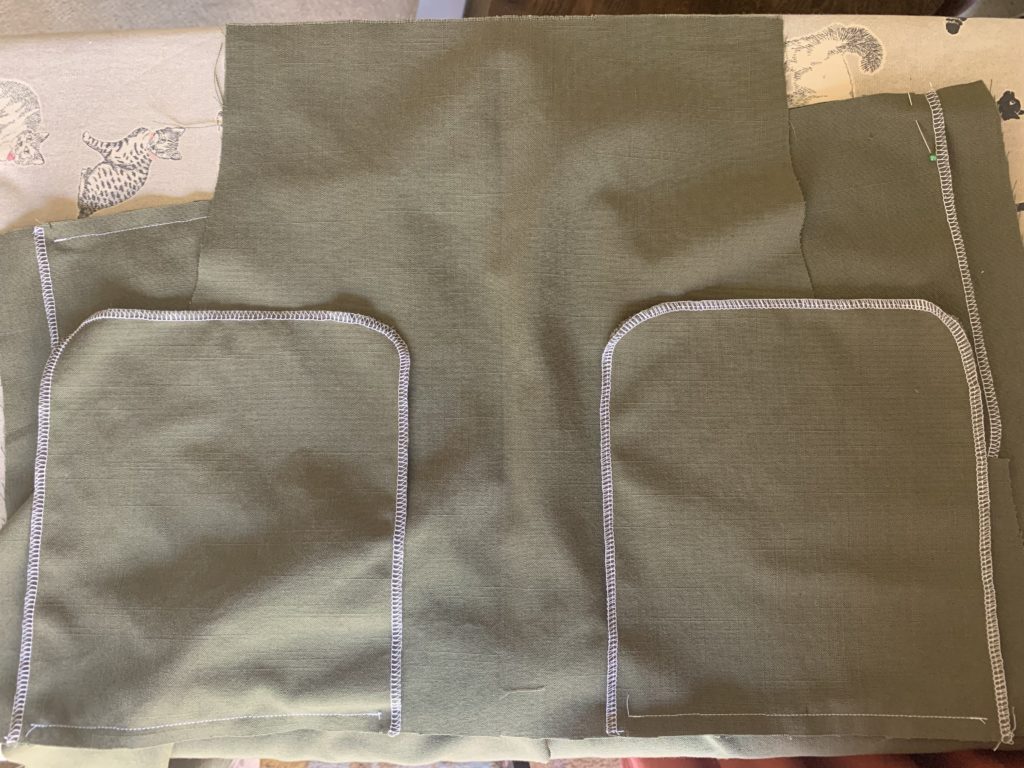
- Cut 3 pairs of the Pocket Piece.
- The new Bottom Front Piece with the rest of the pattern pieces as per instructions.
- I added a small facing to the top of the bib for added stability where the buttonholes are sewn but did this after adjusting the bib piece.
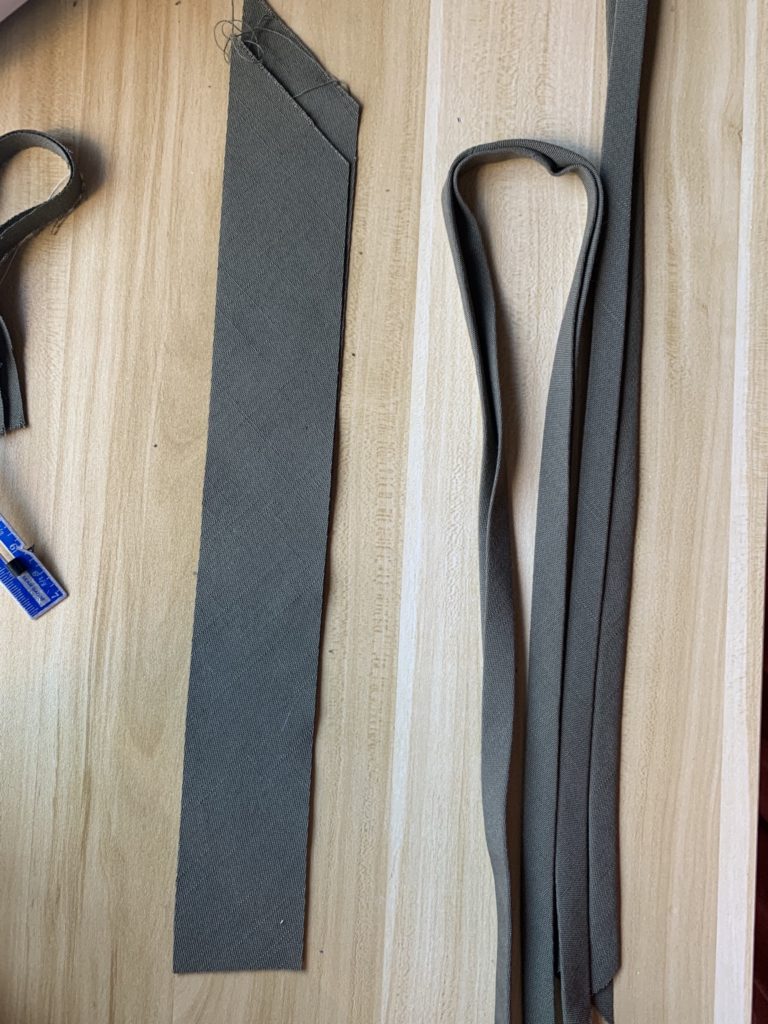
- Cut 2″ wide bias tape from your fabric
The Pockets
- Sew the front crotch seam together. I finished the edges by serging together, pressed to one side, and then topstitched as stated in the instructions.
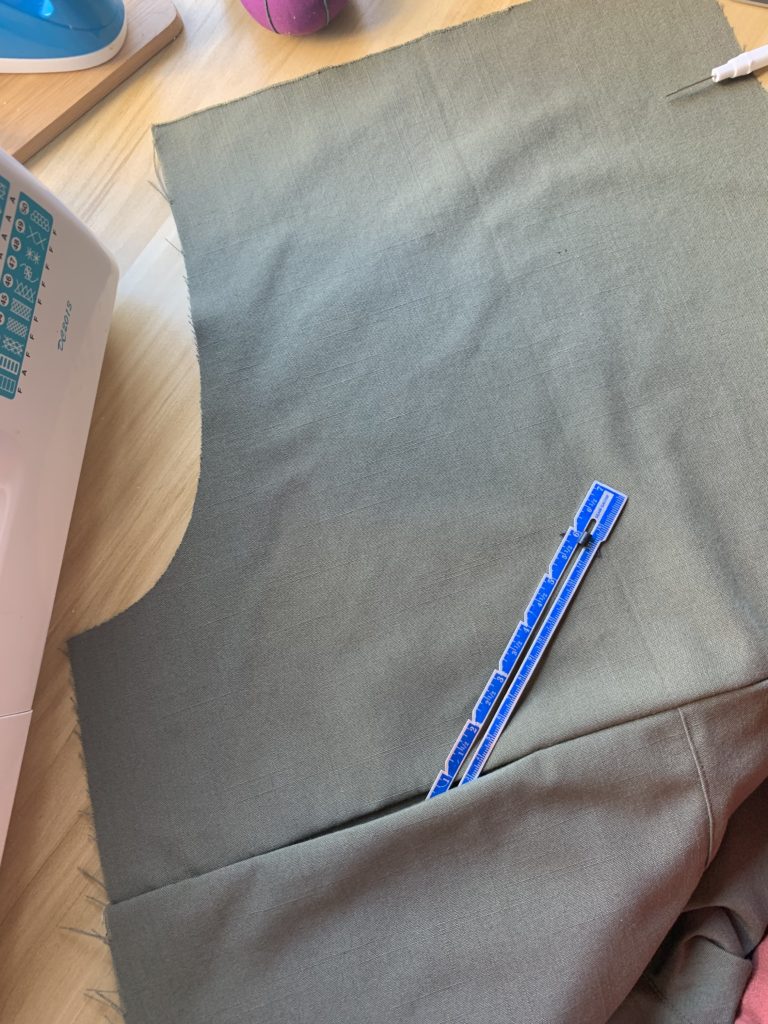
- I finished the edges of 4 of the pocket edges on my serger and gently rounded the the edges with my serger blade to save time. Save 1 pair of pocket pieces for the back patch pockets.
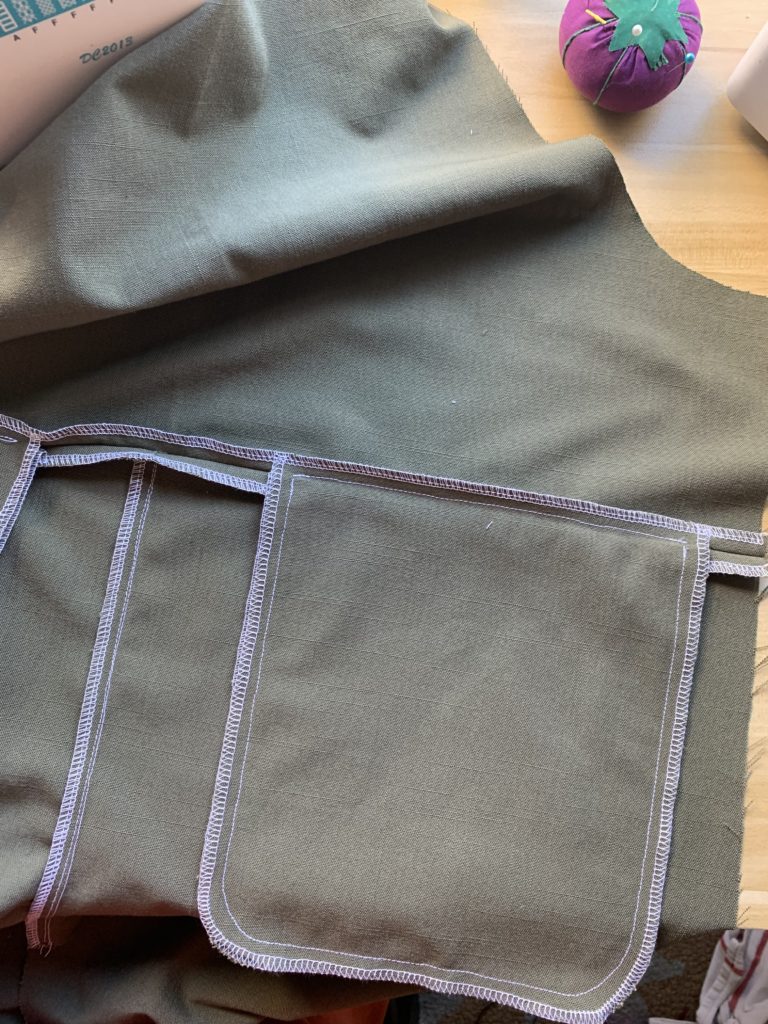
- Pin your 4 finished pocket pieces to the Font Top Piece and Bottom Top Piece along your new seam about 1.5″ in from the outside edges and right sides together.
- Sew along the top of the pocket slightly within the seam allowance. Try not to sew past the 3/8″ seam allowances around the pocket edge.
- Finish the seams separately.

- Press the pockets away from the front pieces.
- Pin both front pieces right side together and sew together at 3/8″. Avoid sewing your pocket edges. This stitching line should come very close to the stitching line in the previous step.
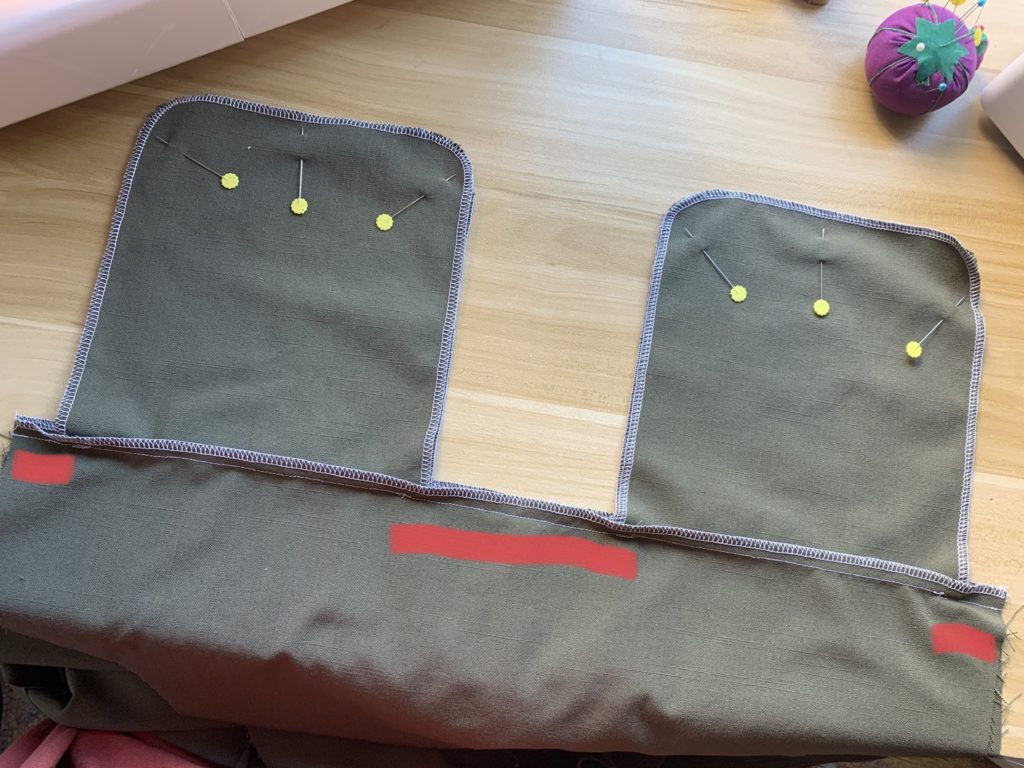
- Sew around the pocket edge at a 3/8″ seam allowance making sure to avoid the seam allowances from the previous step.
Chopping It Up and Drafting a Facing
The bias bound edges on my inspiration overalls is such a lovely touch. At this point I really just followed my intuition and starting chopping away at my garment. If I had really planned ahead of time, I probably would have adjusted the pattern pieces before cutting my fabric. I say probably because I kinda like doing things on the fly.
- Follow the pattern instructions to complete the back patch pockets and sew them to your back pieces.
- Complete the the back, side seams and inseam.
- The pattern suggests a 3/8″ hem around the edges (folding it in twice and pressing) so I removed that total of 3/4″ from all around the sides and top of the dungarees.
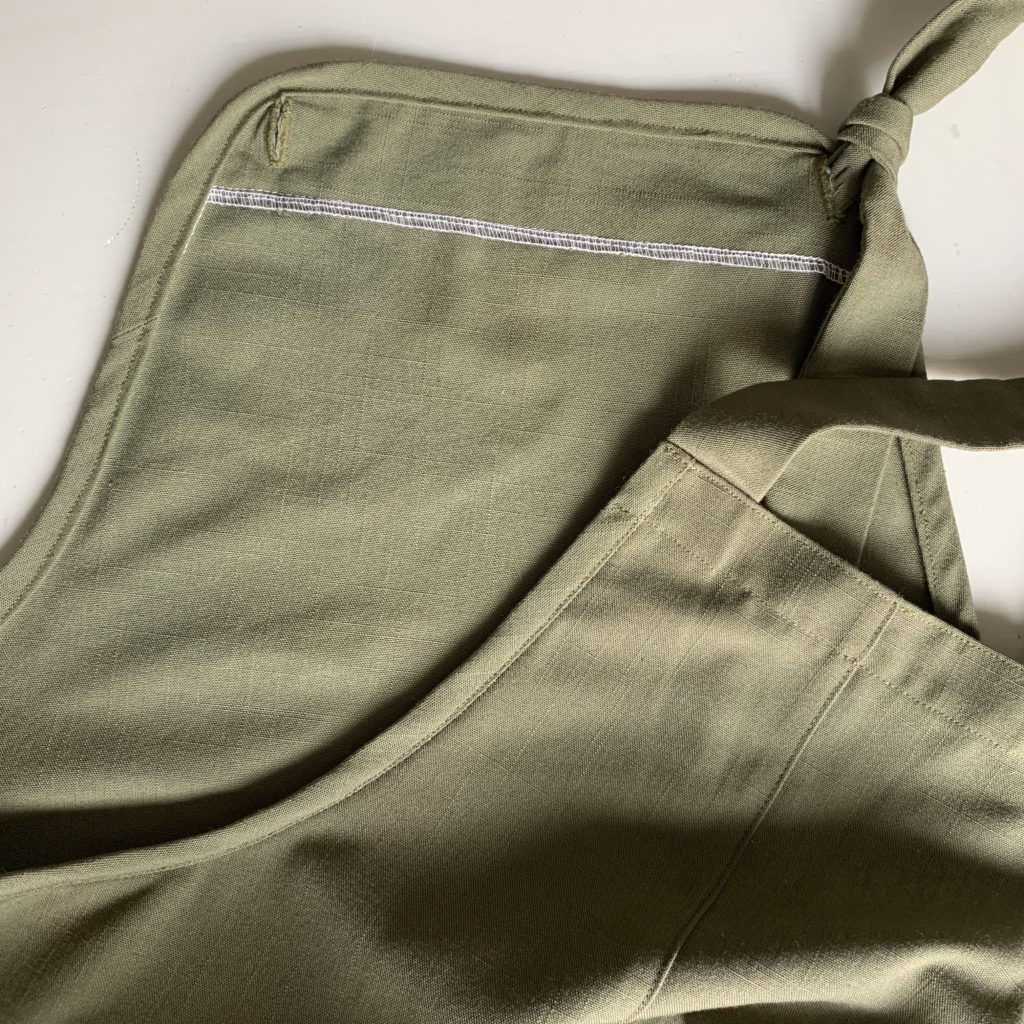
- I removed the 1 3/8″ from the top of the front bib and rather than folding it under as the pattern suggests, I drafted a small Facing. The facing is 2″ wide (I added slight curve to it) using the front piece of the garment itself since it had already undergone adjustments.
- Fuse interfacing to the inside of your facing piece and serge the bottom edge.
- Baste the facing to the front piece with wrong sides together along the top and sides at 3/8″. I also topstitched the facing to the front bib along the bottom of the facing.
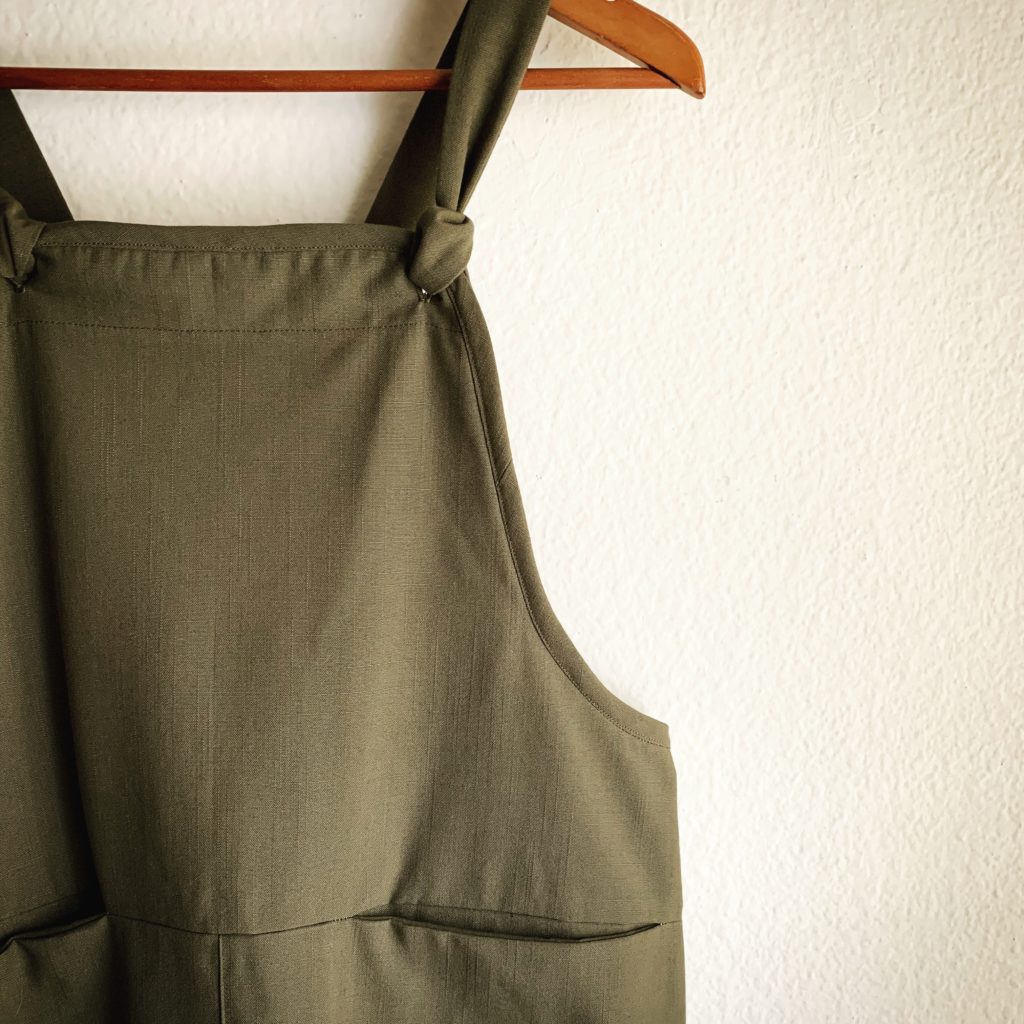
Sewing the Binding
- Prepare double-fold bias binding by pressing down the center and then pressing the outer edges toward the center fold.
- The top of the back bib is finished later according to the instructions. Staring at the top corner of the back of your dungarees place your bias binding with the right side facing the wrong side of your garment. Sew your bias binding to your dungarees down the side, all around the font, and back to the other corner of the back bib at a 1/2″ seam allowance.
- *It’s important to note here that I did not round off the corners of the Front bib before attaching the bias tape. I sewed the bias tape to the front by curving the tape in a way that felt natural and then trimmed the corners back after this step.*
- Press your bias binding away from your garment and wrap it around the edge of your fabric to the right side. Topstitch it in place right along the folded edge of your bias binding.
The Straps
The straps are interfaced but I opted for wider straps and constructed them differently than the pattern suggest. I folded my strap pieces lengthwise with right sides together and sewed across the end of the strap, pivoting at the corner, and then down the length of the strap at a 1/2″ seam allowance. Trim seams, turn them right side out and voilá! This method left me with a wider strap.
Following the instructions I attached the straps to the back of the dungarees but the bulky corners did not allow me to neatly secure the straps with the topstitching technique suggested. Instead I sewed another parallel line along the bottom of the folded edge and called it good.
Go on to sew your buttonholes and hems according to the instructions.
Final Thoughts
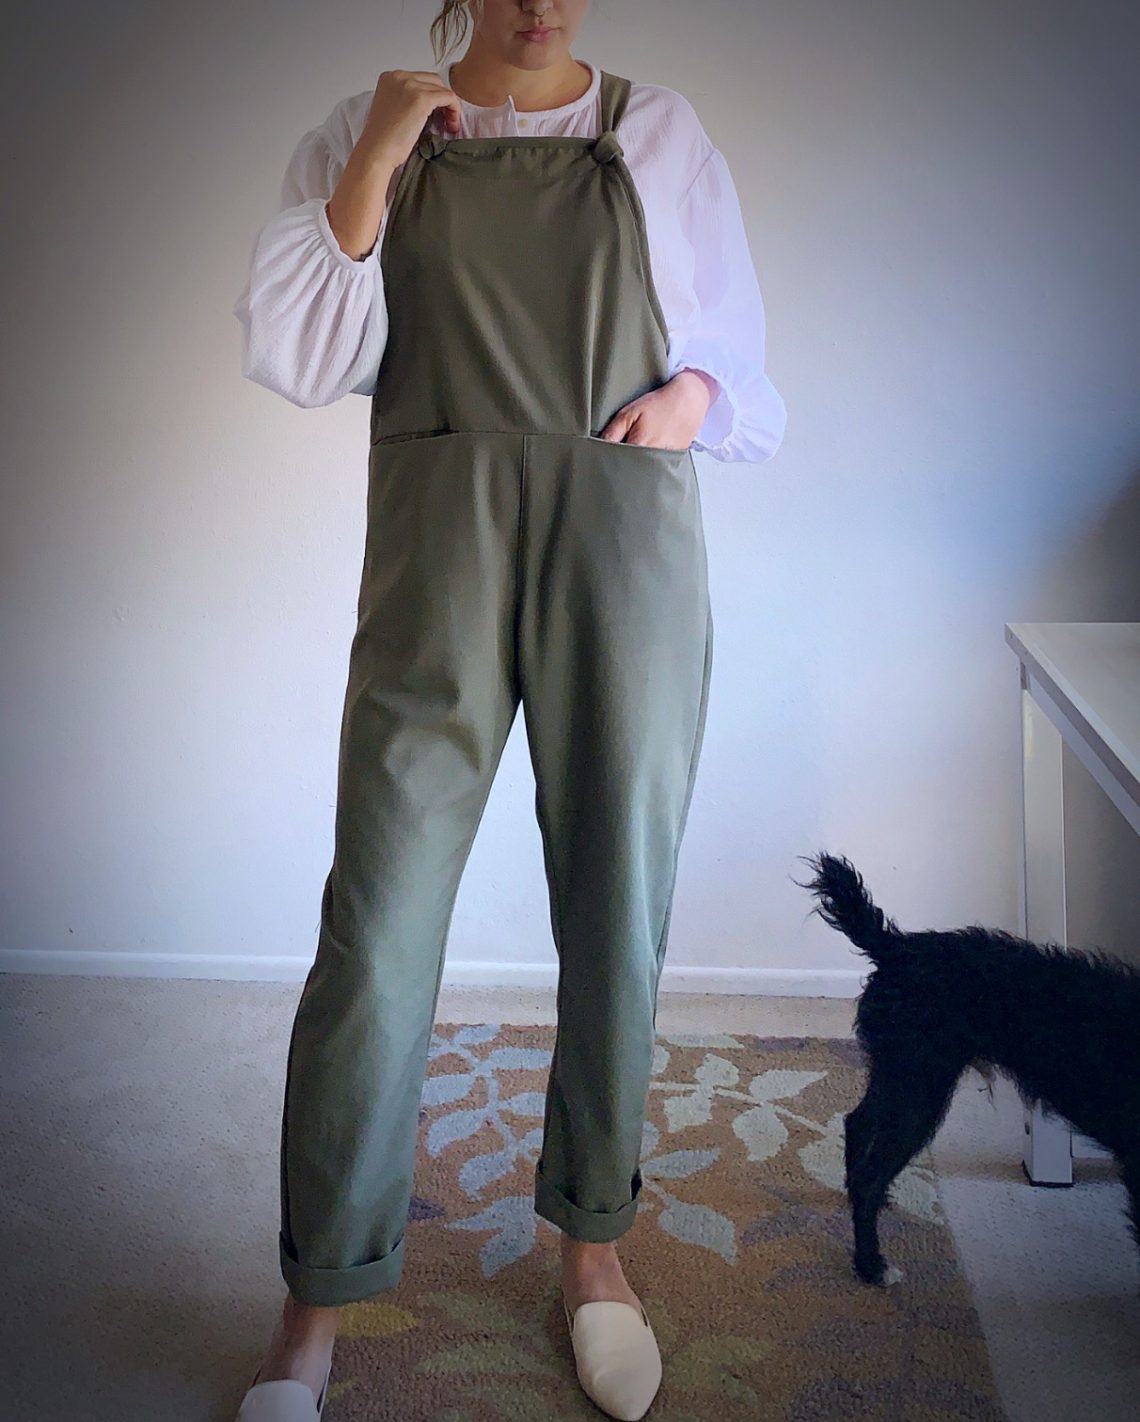
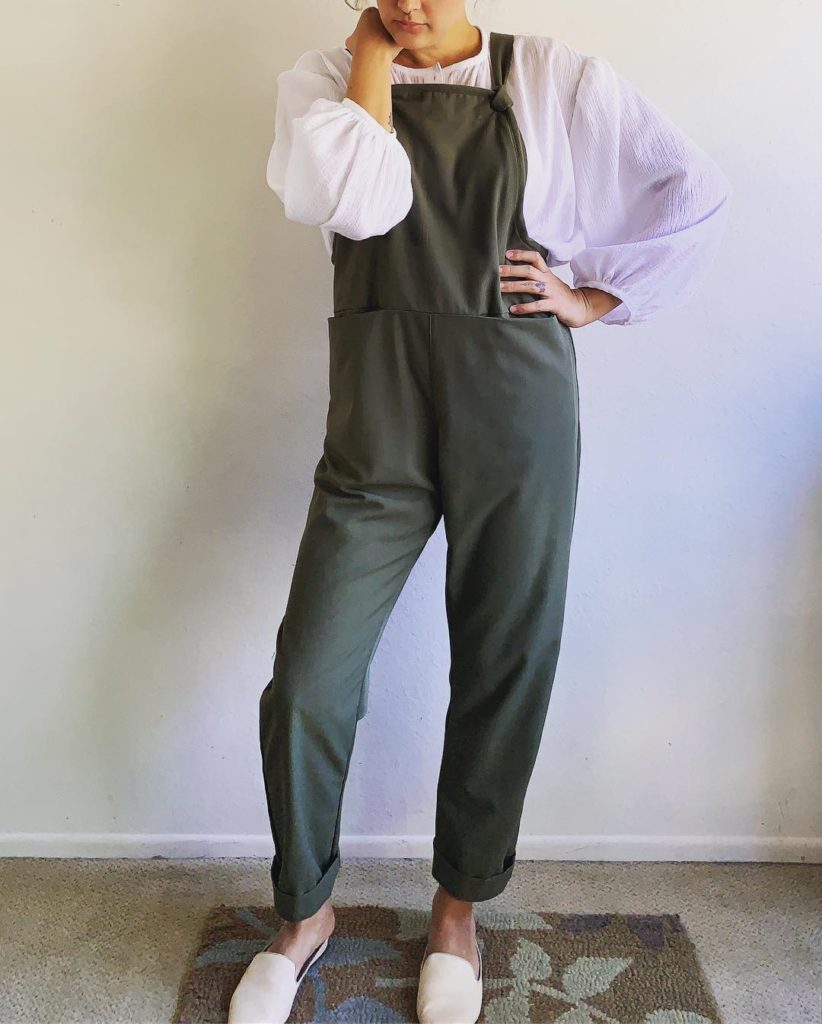
My Heyday Dungarees are quickly becoming a wardrobe staple. They’re already getting a lot of wear so obviously a second pair in linen is in order. Being 5′ 8″ I can say that this pattern in generous in the length. I removed over an inch (I think) from the bottom of the legs before sewing a 1 3/4″ hem and they are barely above the ankle when cuffed. No alterations to lengthen the body were needed either. Overalls with a relaxed style like these are so easy to adjust for your height.
For these photos I paired them with my newly finished Romantic Archer hack and I feel pretty dressed up surprisingly. More often these will be a workhorse for me though. I can already tell that my new dungarees will be an easy choice for days when I’m in and out of the house and want to dress with ease. This fabric would even complement a hike to long walk to be honest.
Next time I may want to try for more of a cropped look (I have a bit of a thing for cropped pants.) Also, I may want to try shortening the bib and increasing the front crotch seam. Would that have a more balanced look? Tell me if you know! The back is different from my inspiration but I do like it. I’m interested but unsure if I want to try hacking the back of these as well.
If you managed to follow along to the end of this lengthy post, thank you so much for reading. Let me know if you have any thoughts! If you try something similar remember to tag me on Instagram. I’d love to see!!