
Reeta and Fremantle
Two Pattern Hacks
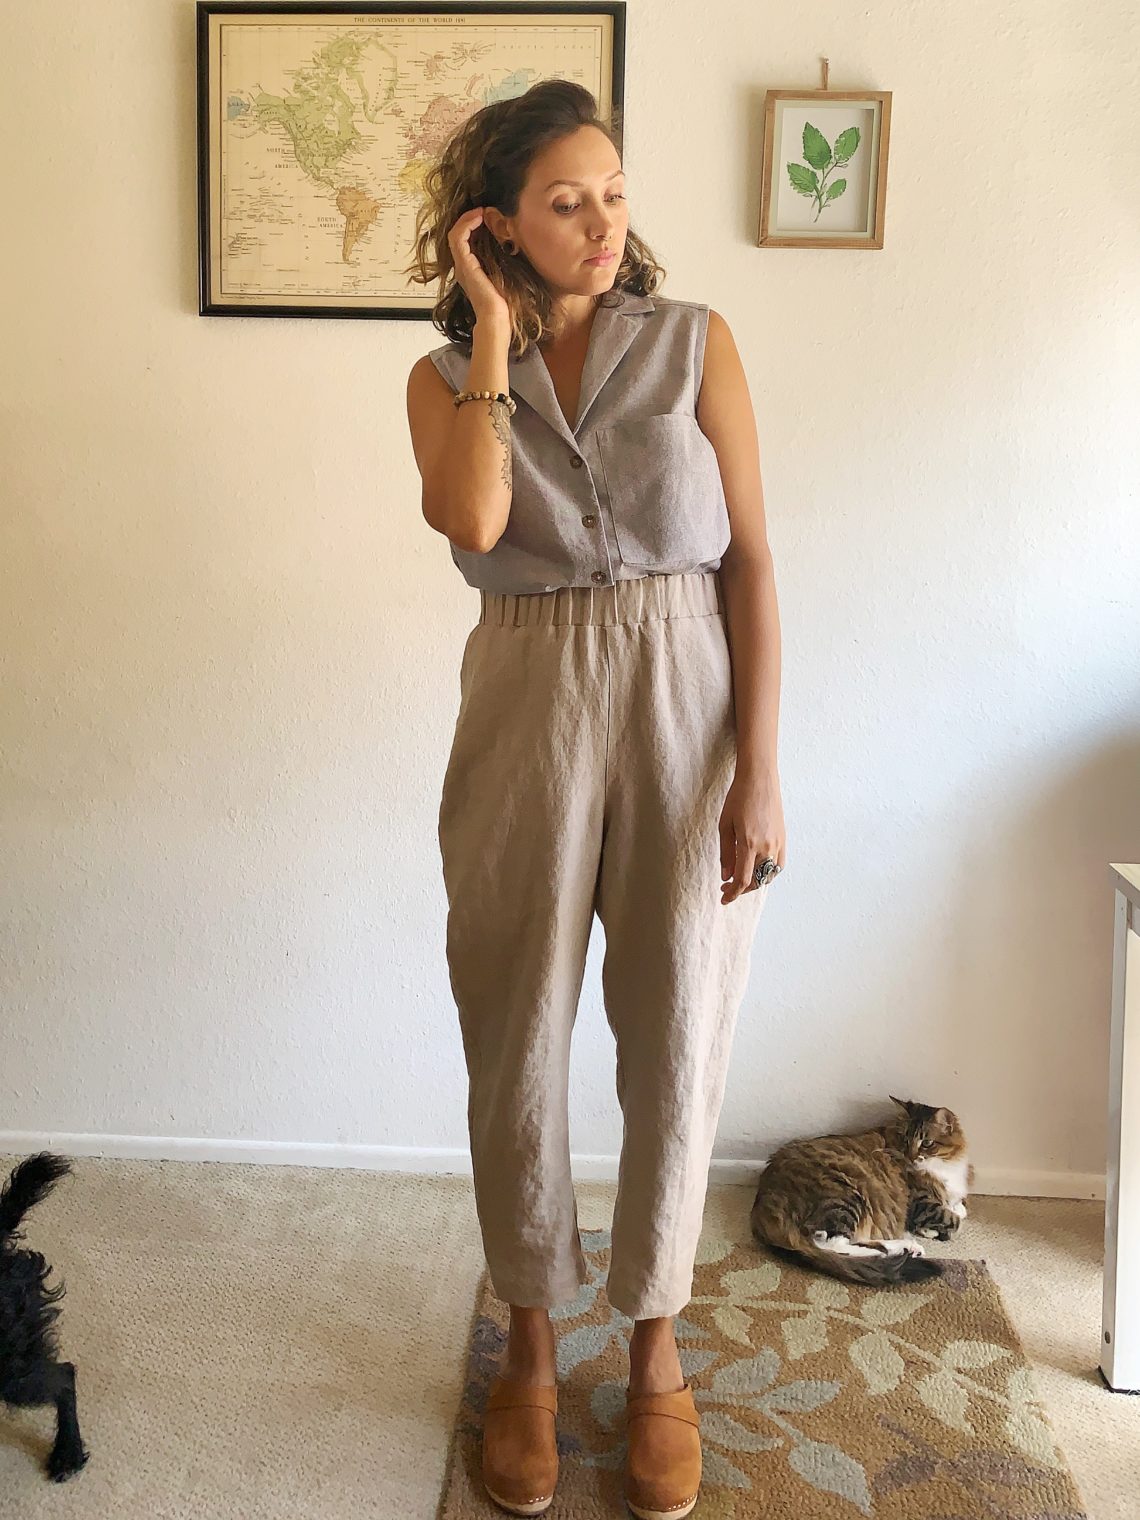
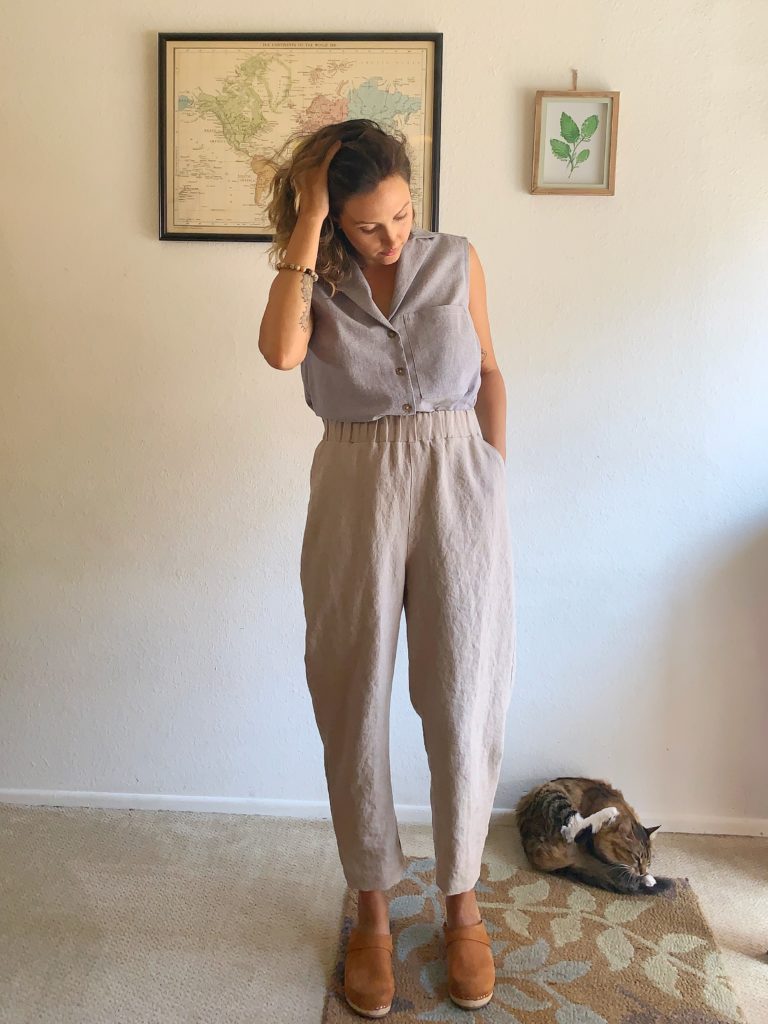
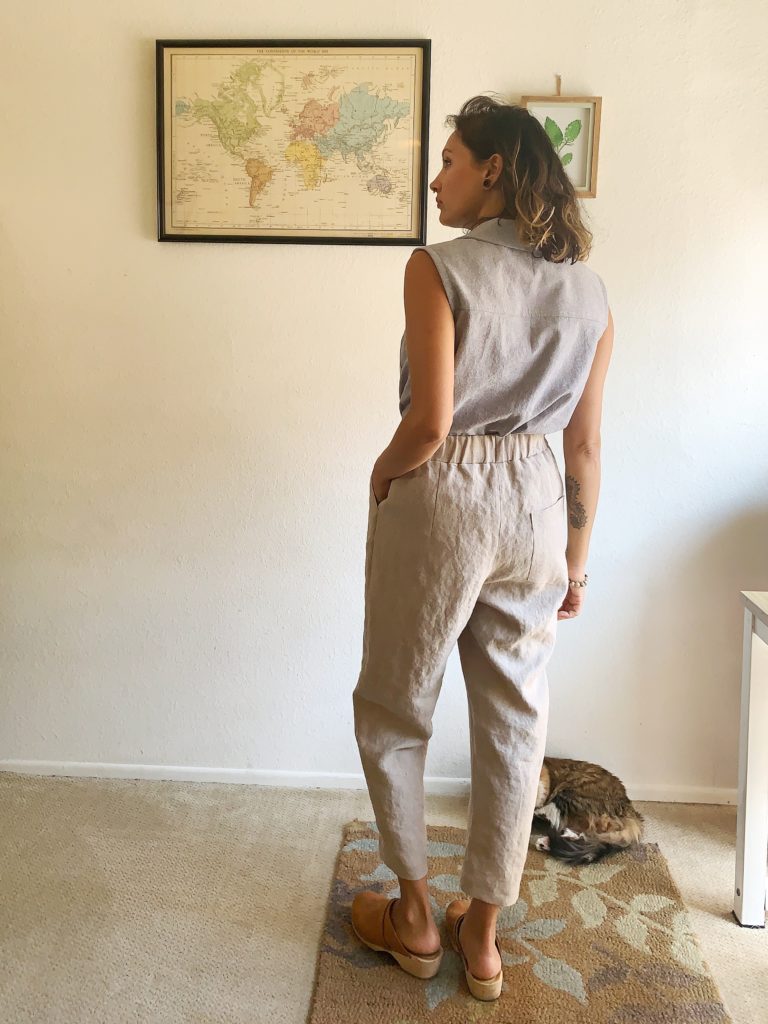
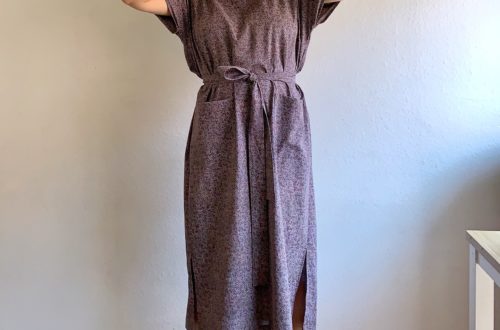
Hey there, friends. I sewed up variations of both the Reeta Midi Shirt Dress by Named Clothing and the Fremantle Pants by Elbe Textiles. This look honestly turned out exactly as I had envisioned. Keep reading if you’d like to know what I learned in the process.
The Patterns
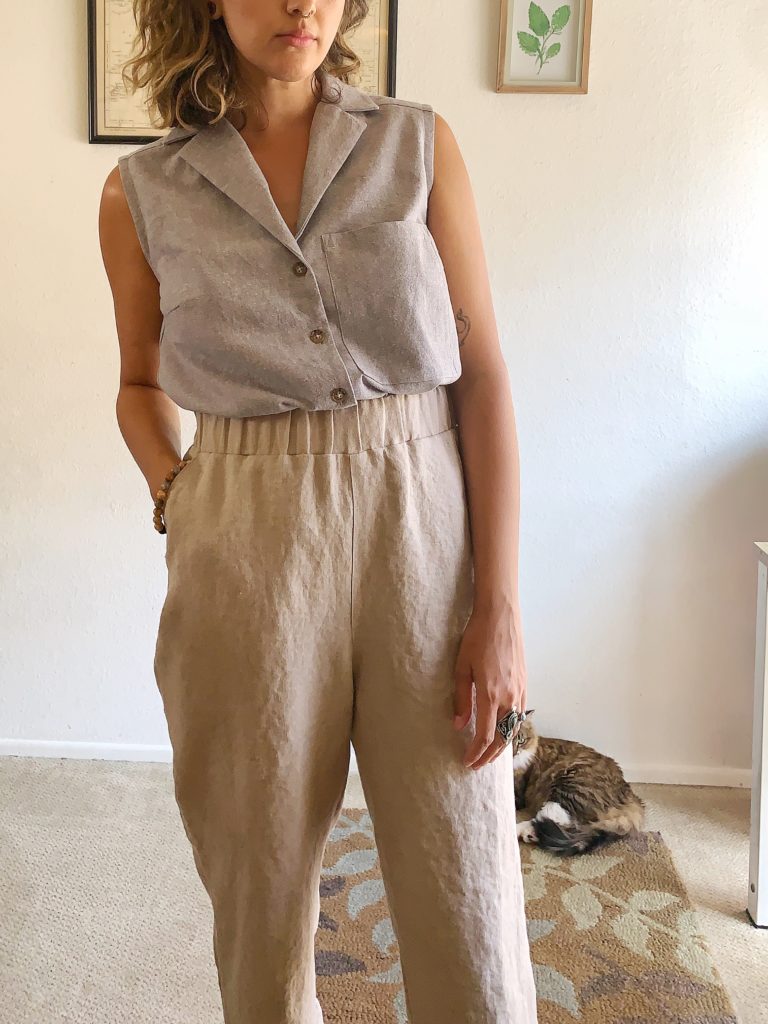
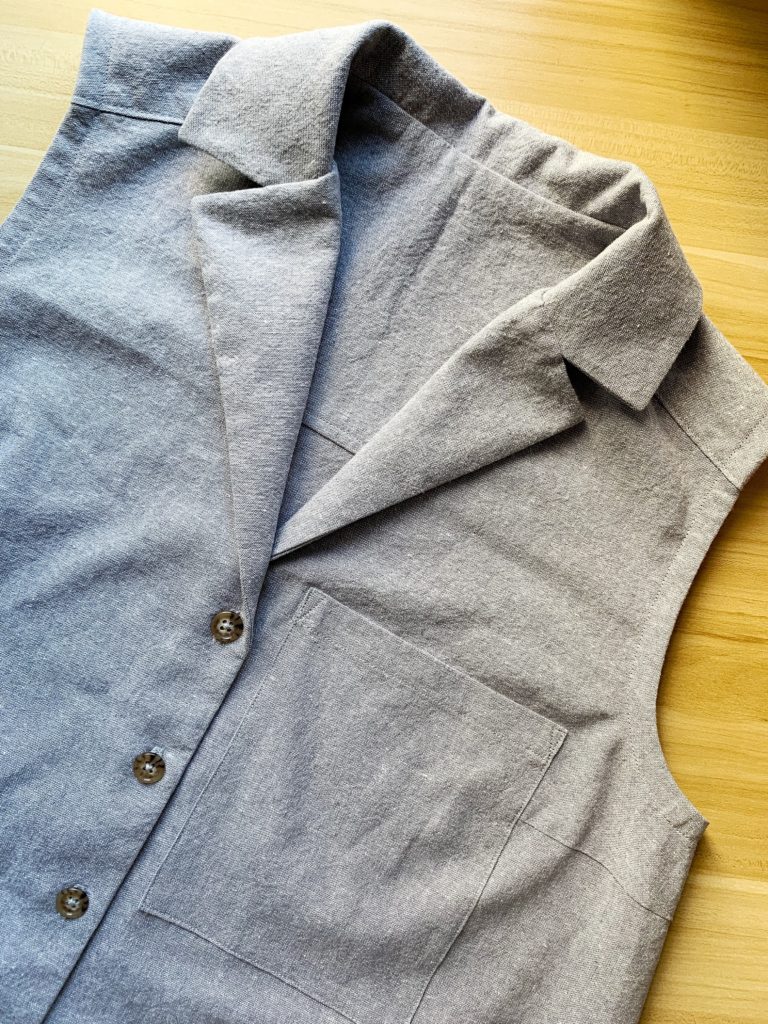
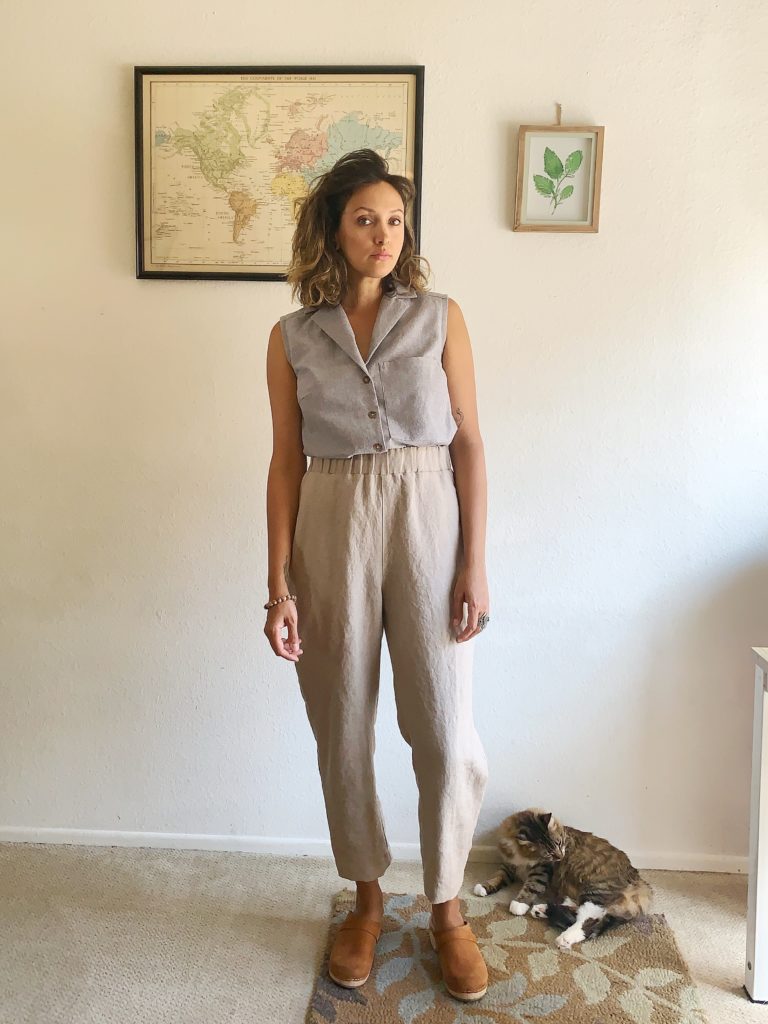
To create this look I hacked the Reeta Midi Shirt dress into the top. This ended up being such a simple hack. This is my second go at making the Reeta and it is such a beautiful pattern. I highly recommend it. Named Clothing is up there for me as far as pattern makers go. Their pattens have such a cool aesthetic.
The pants are the Fremantle pants which I made some small alterations to. My husband actually owns the only other version of these pants I have sewn. After making my hubs a linen pair, a version for myself had been on top of the list. I am so in love with this version. The versatility of this pattern is stellar.
The Fabric
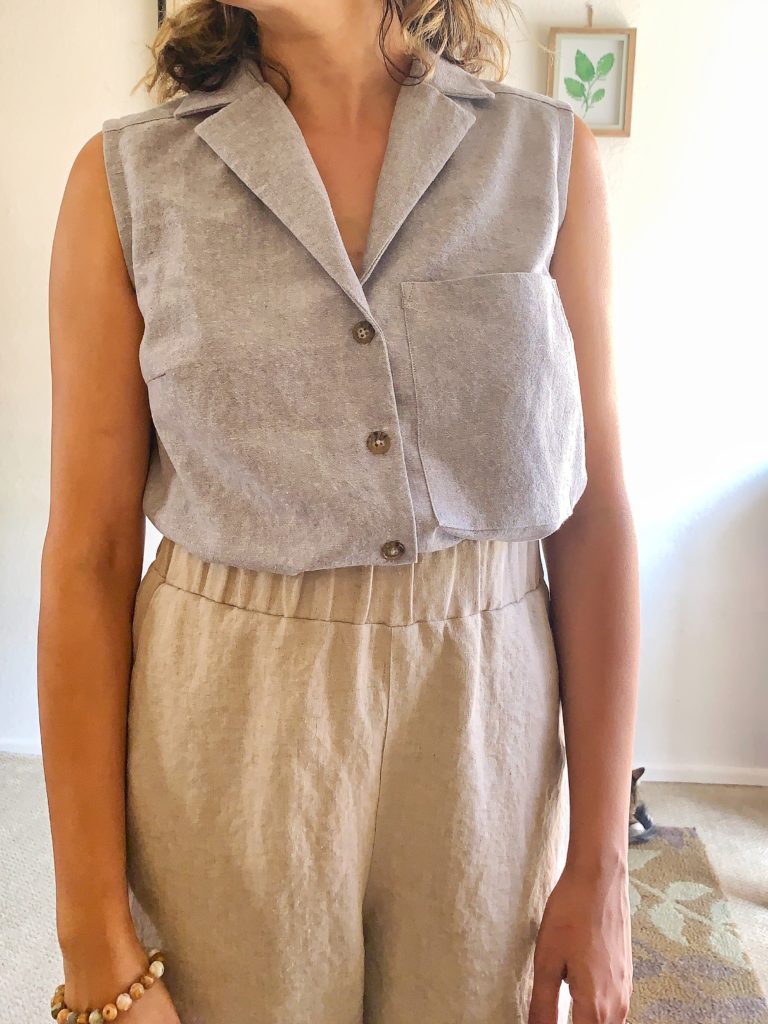
My Reeta top was sewn up using the Essex Linen by Robert Kaufman. It is a linen/cotton blend and has a fairly stable hand. The Fremantle pants are sewn using a natural colored linen from Joann stores. It’s the same fabric I used for my Zadie Jumpsuit. I just love this fabric in its simplicity.

Reeta Hack
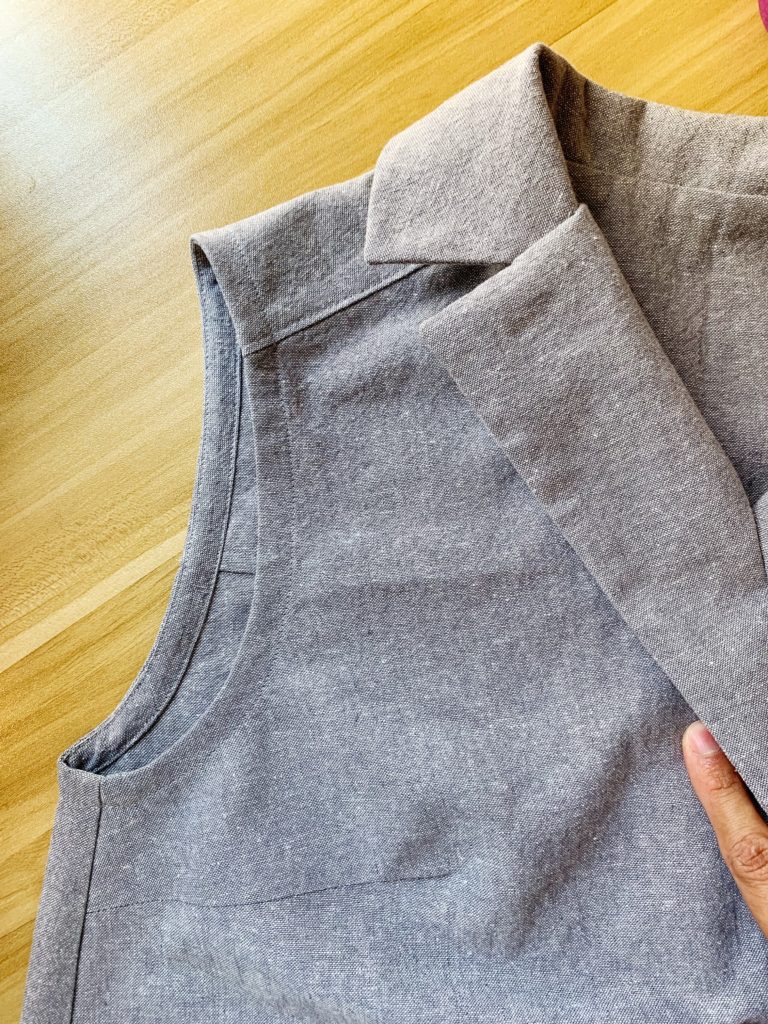
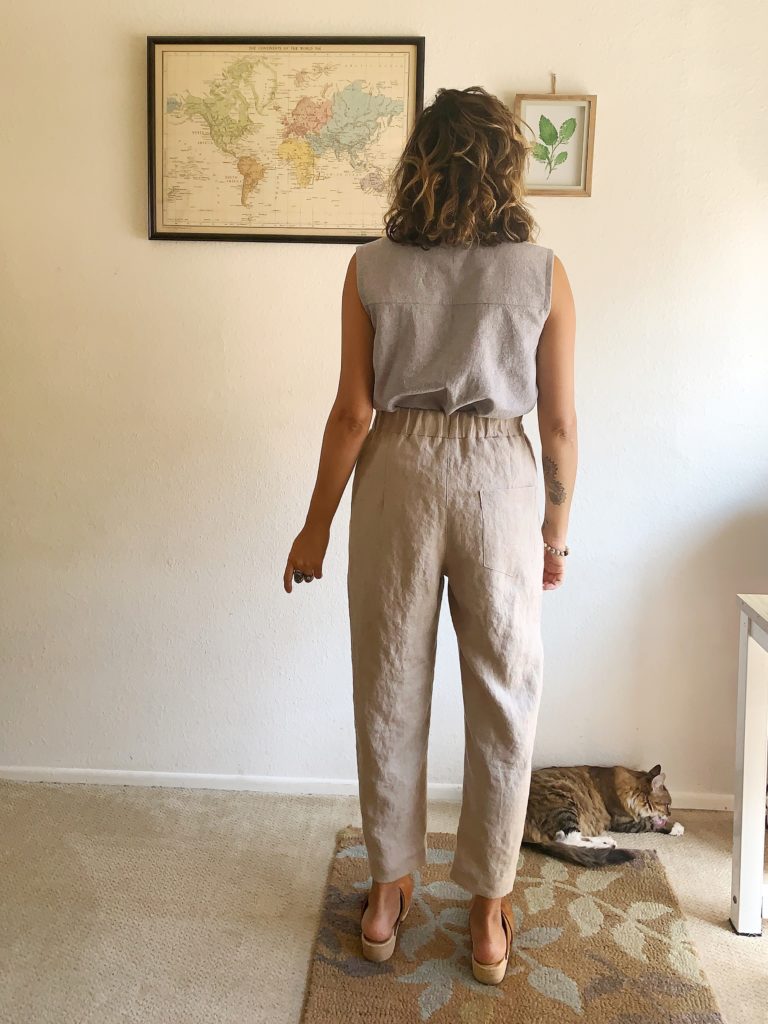
Reeta is super simple to hack into a top. I opted out of the sleeves and raised the bottom of the armscye at the underarm by about 1/4″. The armscyes are finished with self-fabric bias binding. Head over to my Instagram and I have a long story highlight on my profile sharing how I often apply bias binding if you would like a little hand holding. I made my own bias but the store bought stuff works great too.
To get the shirt the length I wanted I simply cut across the front at my chosen spot. Remember to take your hem into consideration. When adjusting the back piece make note that there is a yoke to account for. Using notches and lining things up really helps to make sure your cutting the hem accurately all the way around. What I removed from the center front I then removed from the facing. I always slightly curve shirt hems and do this by eye. Try paying attention to other shirt patterns to get an idea of a natural hem shape.
When I sewed the top I played with the length a little bit and ended up deepening the hem slightly to shorten it. I then adjusted my facing accordingly. The included facing is drafted to be shorter than the garment and assists in the hemming process, so keep that in mind.
When deciding on button placement I used my own judgement. I’m tallish and want my buttons to begin at the right place. I used some simple tortoise shell 5/8″ buttons. The pockets included in the Reeta pattern are real cute but I wanted a more minimalist look and decided to go with one GIANT pocket. I love big pockets, what can I say?
Fremantle Hack
This isn’t really a hack as much as a few simple adjustments. It’s hard to give exact alterations because I played with it a little bit in the process of sewing and sorta winged it but they turned out really good. I will absolutely make myself another pair of these high waisted Fremantle pants.
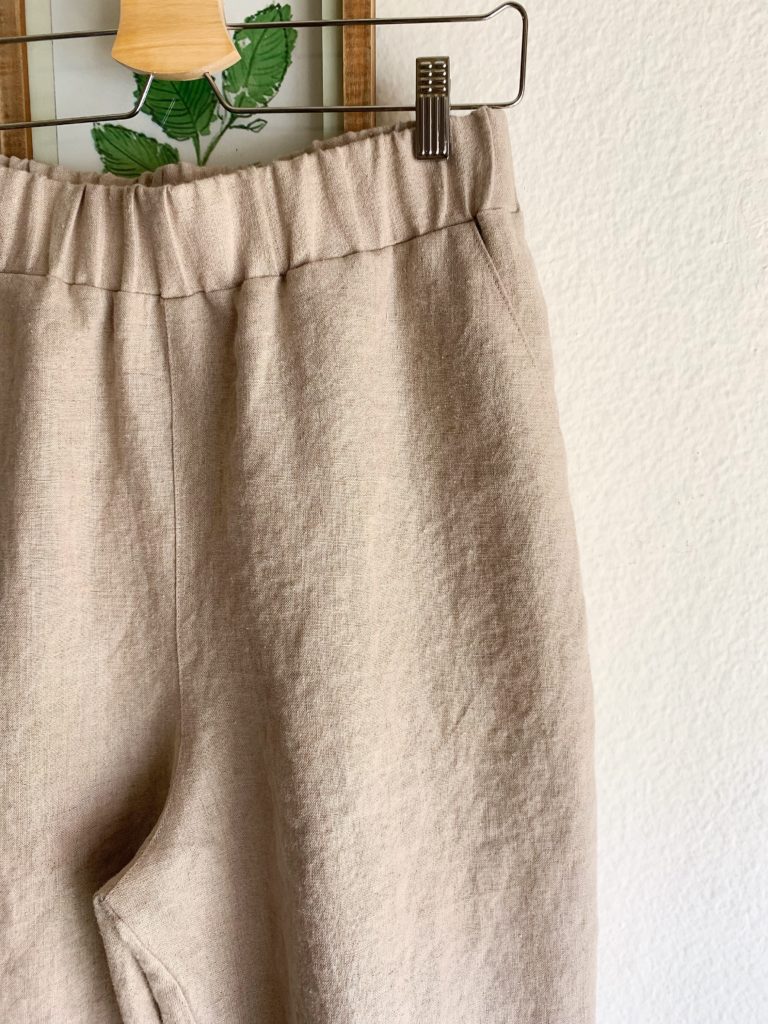
Lengthening the Rise
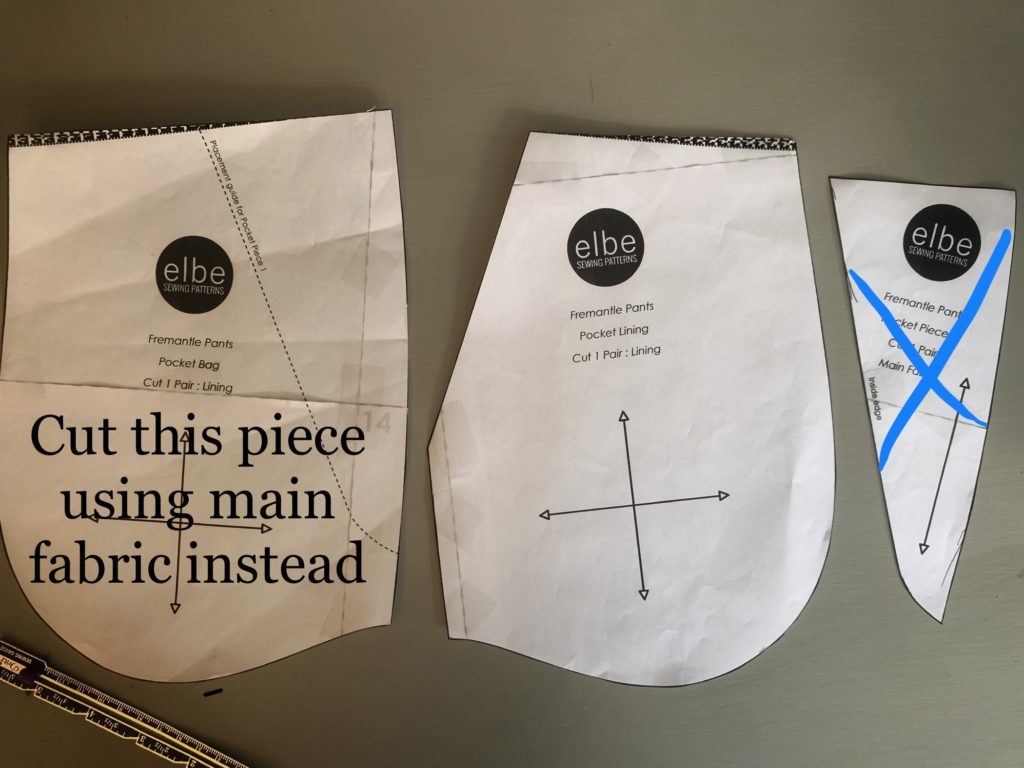
For reference, I used View B of the Fremantle pattern, which is drafted to be a 7/8″ length. To increase the rise I basically added 2.5″ to the top of the front and back pieces. There is a great tutorial on the Elbe Textile blog that shares this part but it ended up being way too much of an increase for me in the end. Her tutorial included swapping inseam pockets for the slash ones, but I decided to keep the pocket pieces as is and made some tweaks. I did find the initial steps of her tutorial helpful.
In lengthening the top of the pants I had to shorten the pocket opening. Otherwise, I thought it would be too long . To do this I raised the bottom of the pocket opening by 1 1/4″. Then I moved the top of the pocket opening about 3/8″ closer to the side seam. This doesn’t have to be exact, I honestly just eyeballed it and used my ruler to draw a straight line.
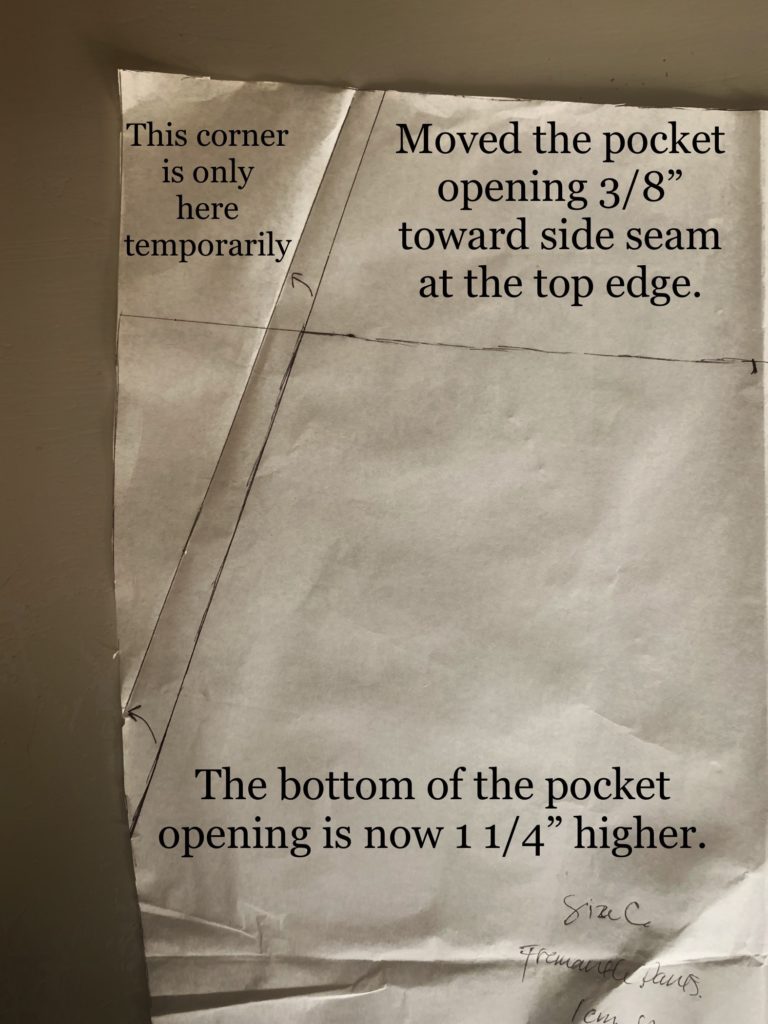
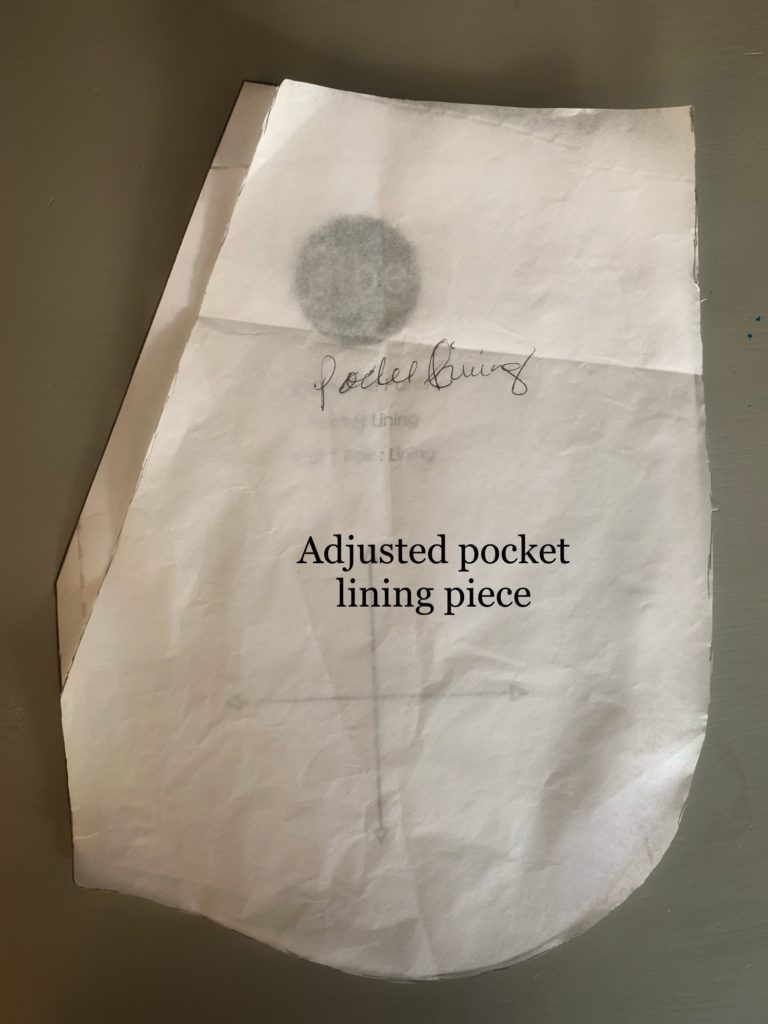
Next, I held my traced Pocket Lining piece against my pants Front Piece to the new angle of the pocket opening, trimming the Pocket Lining to match. Also, instead of using lining fabric for the Pocket Bag, I completely omitted Pocket Piece 1 and used my main fabric for the whole Pocket Bag piece.

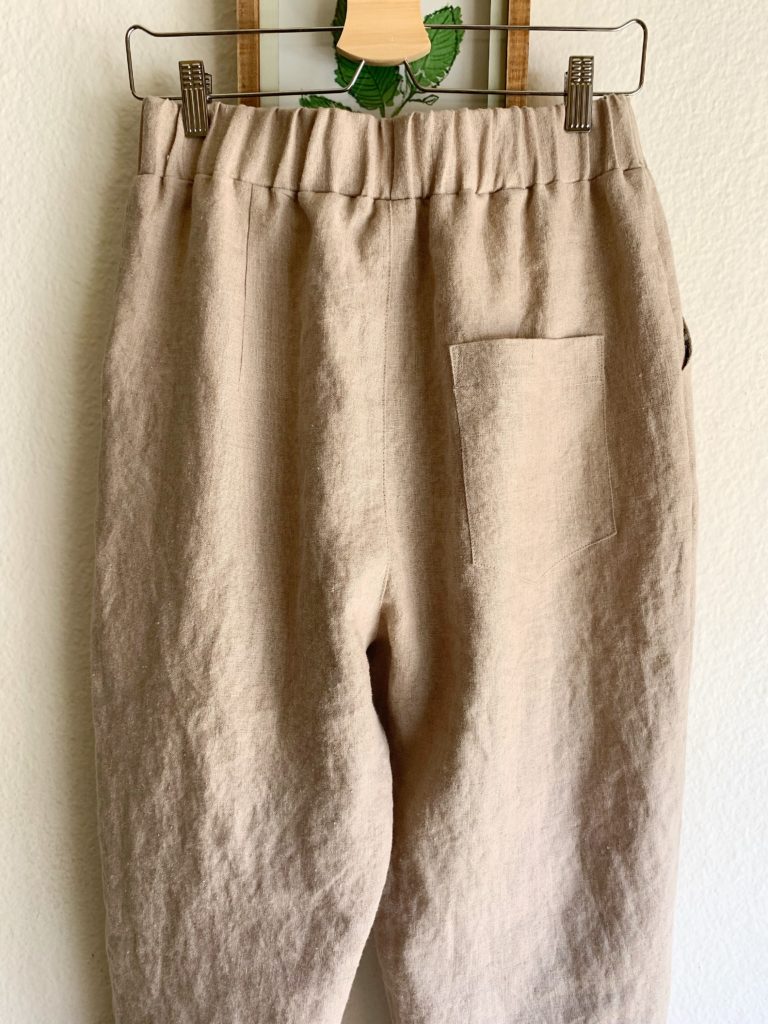
Waistband, Alterations and Back Pocket
After basing on the waistband I decided that I had way overdone the rise and had to scale back. I unpicked the waistband at that point and I took a full inch off of the top of my pants.
Next, I resewed the waistband leaving a small gab at the back to feed my elastic through. Once the elastic was in and after testing the fit I secured the ends of the elastic and closed off the gap at the back of the waistband. In the end the rise is a little long but I love it! It just adds the smallest element that I find really unique.
Additionally, I used only one pocket and I raised it by 3/4″ ( why do I love using 3/4″ so much? Probably cause I’m too chicken to commit to the full inch. What a dork.) I completely skipped the topstitching and drawstring openings on the waistband as well. Instead, there are vertical lines of stitching at the side seams and center back of the waistband to keep everything from rolling on me. It really adds to the minimal vibe of this look.
What I would do differently
What is important to remember is that because I had to go back in and shorten the rise after attaching my slash pockets, the pocket bags also were shortened in the process. If I had known to only increase the rise by 1.5″ at the get-go the pockets would have been perfect. They are a little shallow now but still totally usable. Mama likes big pockets.
Secondly, since the final rise was only increased by 1.5″ I may not have needed to play with the angle of the pocket opening much at all. Hopefully upon making my next pair I’ll have all these kinks ironed out.
Final Thoughts
Sewing classic separates such as these is so satisfying to me. I know these fibers will withstand the test of time. These styles are timeless as well. Both pieces are such wearable additions to my closet. There is also something comforting about the elastic waist pant (other than the obvious comfort). Over the last decade my weight has fluctuated so much, what with child bearing and dietary changes, you name it. Garments like these really take the edge off. If my size fluctuates a little bit I can still reach for these two, and what a blessing that is.
I am so glad I finished both the Reeta top and Fremantle pants in such close succession. They make a cute pair. These garments make me feel comfortable (which I find so important) while still feeling put together. Plus, neutral colors are my jam lately, which I’m sure may come off as boring to some. I can’t help it. Neutrals are making me feel right at home. Bye for meow!


One Comment
Ellen Lindner
Thanks for all your thoughts here! My question is – did you feel like the sizing for the Fremantle pants was accurate?